JVC QL-Y5F Restoration
I couldn't resist.
I bought a JVC QL-Y5F turntable as a restoration project. I was in a right state, no counterweight, Headshell, platter mat or lid. The poor thing had all its corners smashed in, the veneer was gouged and bashed everywhere, and the platter was corroded so badly in places that i couldn't polish it out.
But I had to have it.
I have history with these decks you see, I have had 3. And sold 3. And then immediately wished I hadn't.
They are also the only turntables I have ever had that the missus has ever used. She refuses to use turntables unless they are automatic, which this one is. Or is now, after I put the hours in.
I didn't pay a great deal of money for it, which is kind of a good job.
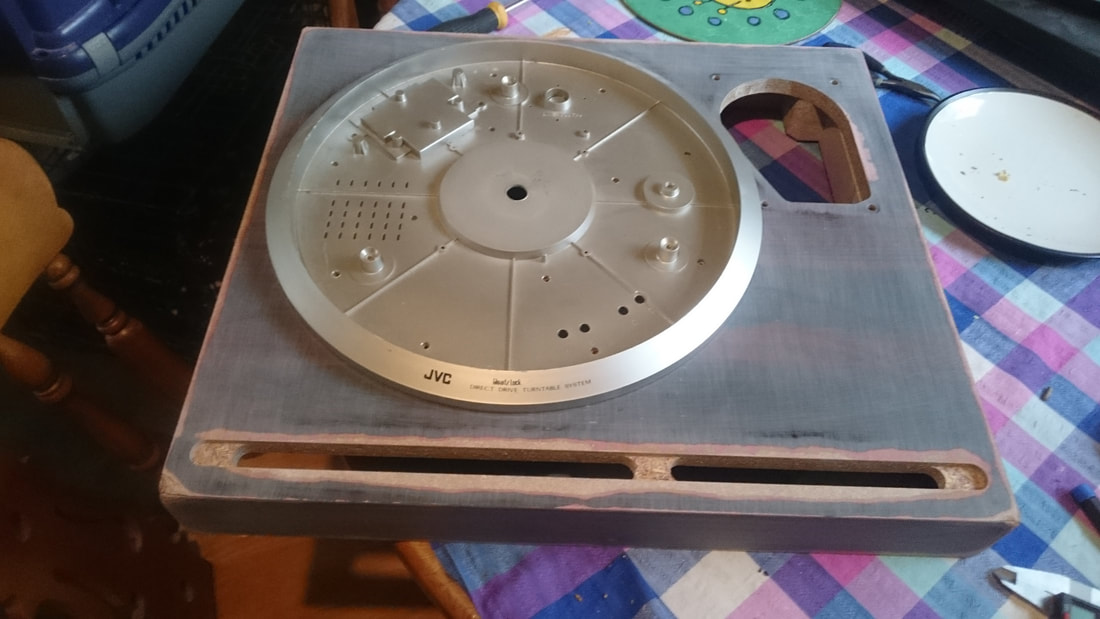
This is what I received, but then I knew what i was buying and potentially letting myself in for
I bought a JVC QL-Y5F turntable as a restoration project. I was in a right state, no counterweight, Headshell, platter mat or lid. The poor thing had all its corners smashed in, the veneer was gouged and bashed everywhere, and the platter was corroded so badly in places that i couldn't polish it out.
But I had to have it.
I have history with these decks you see, I have had 3. And sold 3. And then immediately wished I hadn't.
They are also the only turntables I have ever had that the missus has ever used. She refuses to use turntables unless they are automatic, which this one is. Or is now, after I put the hours in.
I didn't pay a great deal of money for it, which is kind of a good job.
This is what I received, but then I knew what i was buying and potentially letting myself in for

What you can't see, is that under all the dust and crap on it, the clearcoat over the veneer was cloudy and crazed.
The deck must have been stored somewhere where it was damp, maybe a leaky attic space or a cellar, as there was lots of evidence of water damage. All the plinth joints were swelled up, and as the long joints between the top surface and the sides are mitred aswell, they had split too.
Initially I thought I was going to have to build a new plinth from scratch, so it got dumped on top of a wardrobe for 8 months until I looked at it again. In the intervening 8 months I sourced a JVC headshell, not the original one, but one off a victor ua5045s arm which would have been on the QL-7 model. But close enough.
And after hunting for the correct counterweight for months without luck, I got a Technics SL1200 counterweight which has the same size hole for the counterweight stub. The weight is about the same as the original.
Second time around, I took the base off and was pleasantly surprised to find that the plinth was not blown inside. It was just the top 2mm or so of each joint that had got wet, swelled and then shrunk back as it dried. The joints were all fundamentally sound. So it could be saved......
I also discovered that the internals, the main pcb, the control pcbs, the transformer and arm servo mechanisms were all pristine. Not a mark on them. No corrosion, no leaking caps, knackered IC pins, nothing at all. Not even any old dust, or that ozone smell that old and used electronics has. You'll know that smell if you've ever opened up any old piece of kit..... So I was quietly confident that it would work once fettled.
So it was stripped down and all the parts stored carefully so as not to damage that wonderful electrodynamic servo tonearm or any of the almost 40 year old pcbs.
I bagged all the fixings in separate labelled bags so as not to lose them, and to tell me which bit the many many different sized self tappers came from.
Then attacked it with the sandpaper and a hardwood block. The plan was to sand clean through the veneer and blown substrate using the hardwood block and paper instead of an electric tool or a cork block. The thinking was, that the hardwood block would keep the paper perfectly flat against it, and not give at all. The plinth would then square up as I sanded. It would sand right through all the high spots where the plinth was blown until it hit the low spots in the centre of the side panels which would spread the force evenly. It did, and I ended up with a bang square plinth. That looked even worse than when I started.
The silver trim panel had a large gouge in the left hand side so i had to fill that with fine surface filler, the kind used for scratch repair on car bodywork. So I was going to have to respray the trim which would mean losing the JVC script on the front. But it was tough. It was either that or leave the gouge in it which I wasn't prepared to do.
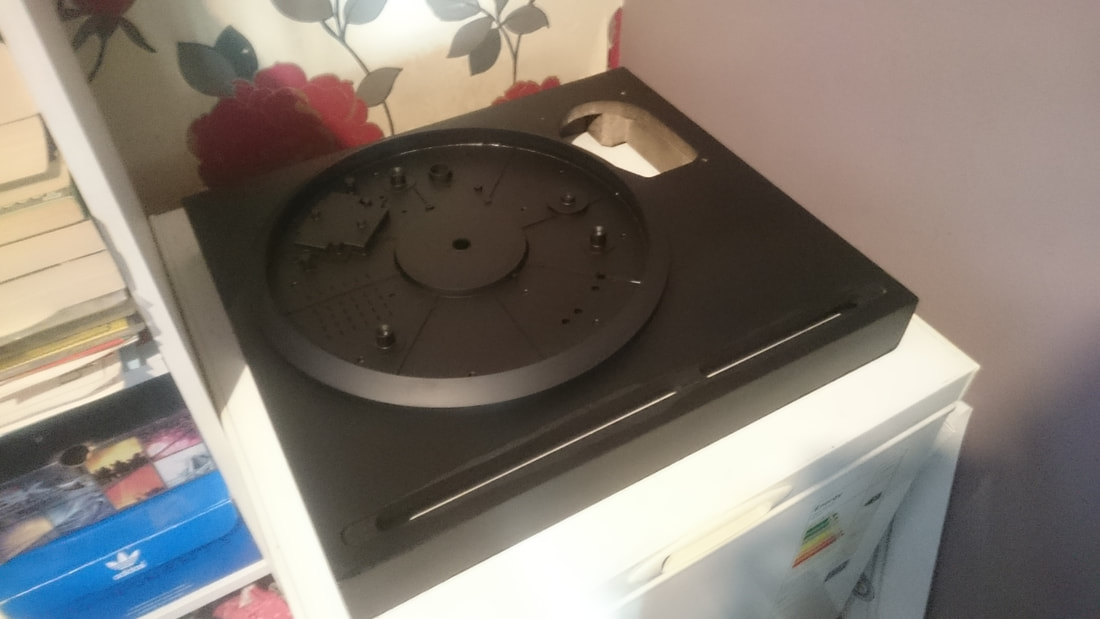
So the trim was filled, sanded and prepped with matt black paint so that I could see if there were any other marks to sand out.
I also finished the plinth, filled all the open joints, built up the corners that were missing with body filler, then sprayed that matt black too to seal it and prepare it for veneering
The matt black got me thinking. The one thing I'd never liked about the decks was the shiny shiny clearcoat finish. I always thought it was too...... garish for want of a better word. Abit 80s flashy on what is otherwise a quite handsome and understated piece of equipment given its enormous size.
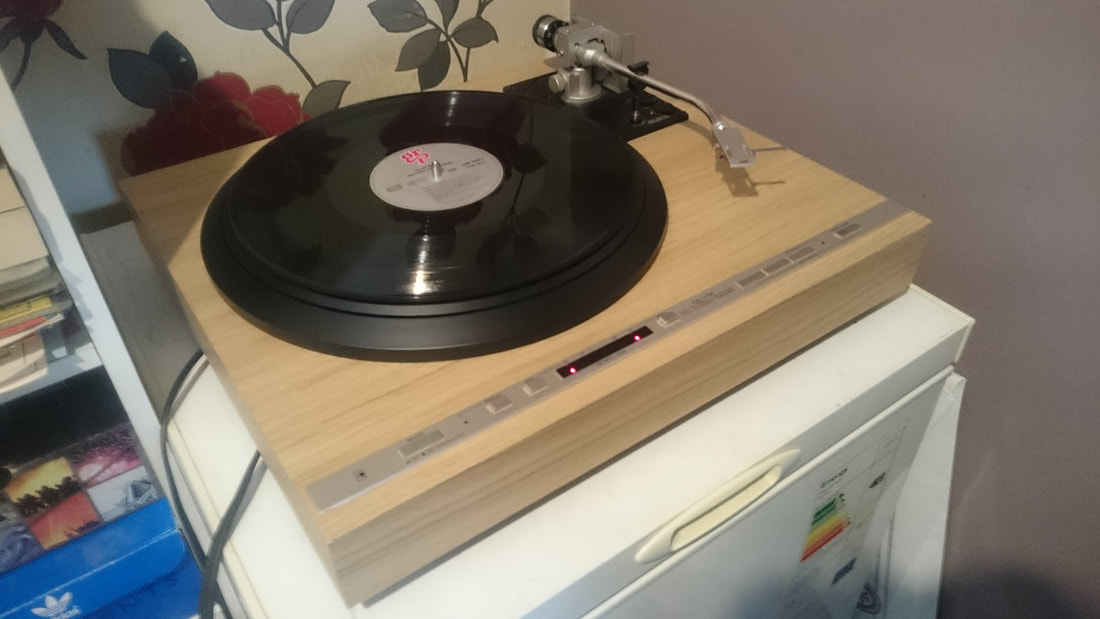
I wanted it to look abit more modern, and as it was never going to end up standard, I decided on a light wood veneer with a satin finish via clear wax. I ended up going for light oak.
As you will note from the first picture, the base for the active arm is satin black. And the supposedly matt black paint has abit more of a satin sheen to it than one would expect.
As the platter was not polishable due to the surface corrosion, I decided that I would etch prime the platter (had to use etch primer as it is aluminium, normal primer and paint don't stick properly) and paint it so it looks right. The etch primer I used was very dark grey..... setting more cogs in motion.
When I had veneered the plinth I just used a clear wax so that it stayed light but pulled the grain out, and decided to partially rebuild the deck so I could decide between the contrast between the oak and black, or the originality of the silver.
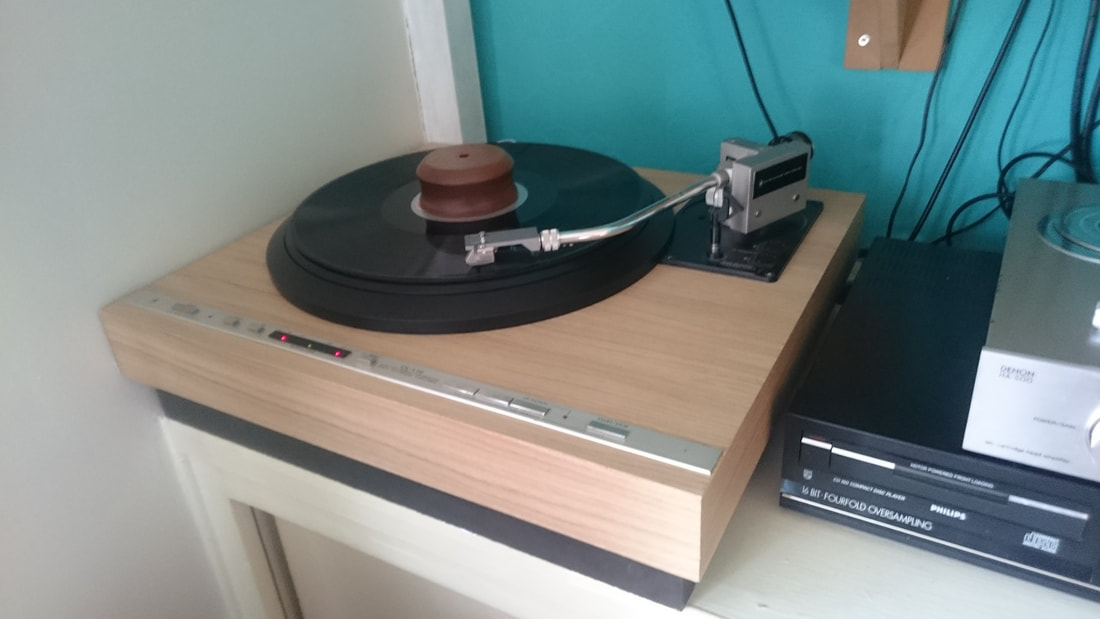
I went for the black trim, and as part of the appeal of the deck for me was the shape of the drive section, decided to paint the platter black to match the trim.
I wanted it to look abit more modern, and as it was never going to end up standard, I decided on a light wood veneer with a satin finish via clear wax. I ended up going for light oak.
As you will note from the first picture, the base for the active arm is satin black. And the supposedly matt black paint has abit more of a satin sheen to it than one would expect.
As the platter was not polishable due to the surface corrosion, I decided that I would etch prime the platter (had to use etch primer as it is aluminium, normal primer and paint don't stick properly) and paint it so it looks right. The etch primer I used was very dark grey..... setting more cogs in motion.
When I had veneered the plinth I just used a clear wax so that it stayed light but pulled the grain out, and decided to partially rebuild the deck so I could decide between the contrast between the oak and black, or the originality of the silver.
I went for the black trim, and as part of the appeal of the deck for me was the shape of the drive section, decided to paint the platter black to match the trim.
Then set it up properly as the manual decrees (see the vinyl engine for a pdf copy) with my AT-F7 moving coil in a Jelco headshell as the JVC one is abit heavy.
It works perfectly. All functions work as if it was new, confirming my initial thoughts after I opened it up, that it had hardly ever been used before being mothballed. I imagine whatever poor sod bought it in 1980 got suckered in by the flat earth crowd, went out and bought an LP12 and never mentioned the AUTOMATIC JAPANESE DIRECT DRIVE ABOMINATION EVER AGAIN.............. but seriously, the robot arm is genius, you can put practically anything in the headshell and it will work perfectly. The auto functions are a pleasure to use with their tactile soft tough buttons and the sound is so smoooooooooth and cultured and precise and beautifully judged. But with guts too, unlike some other dd machines I could mention. Ive now put my AT150sa cartridge in it and it is just sublime. It hasn't the drive and rhythm and verve and sheer power of a Lenco, or G99 or 401, its a different presentation, but an oh so beguiling one....
It works perfectly. All functions work as if it was new, confirming my initial thoughts after I opened it up, that it had hardly ever been used before being mothballed. I imagine whatever poor sod bought it in 1980 got suckered in by the flat earth crowd, went out and bought an LP12 and never mentioned the AUTOMATIC JAPANESE DIRECT DRIVE ABOMINATION EVER AGAIN.............. but seriously, the robot arm is genius, you can put practically anything in the headshell and it will work perfectly. The auto functions are a pleasure to use with their tactile soft tough buttons and the sound is so smoooooooooth and cultured and precise and beautifully judged. But with guts too, unlike some other dd machines I could mention. Ive now put my AT150sa cartridge in it and it is just sublime. It hasn't the drive and rhythm and verve and sheer power of a Lenco, or G99 or 401, its a different presentation, but an oh so beguiling one....
Back in 1980 it would have cost yer average punter about 400 quid with a nice cart on it, that equates to about 1200 quid in todays money. Technics have re released the SL1200, and that is now a couple of grand. Imagine what a new one of these would cost.....
The perfect deck for the 'Vinyl Revival'?
Geeky electrodynamic active arm for the techies.
Sooooperb sound quality for the audiophools.
Big and handsome for those who want the impressive looking centrepiece, the 'LOOK AT WHAT IV'E JUST BOUGHT' crowd.
Technologically advanced enough for those who have to have the 'BEST SPECS' ! (you know who you are, I bet you just upgraded your phone to the very latest handset ;-))
And automatic.......for the people. Your wife/missus/significant other will actually be able to use it without you cringing.
Did vinyl replay really get any better after these and their ilk were released?
I'd genuinely forgotten how good these things are, my other 3 were not as nice as this one is now, but I never restored them. I think these are genuinely a forgotten gem
